How Auto Body Repair Services Restore Your Vehicle After a Collision

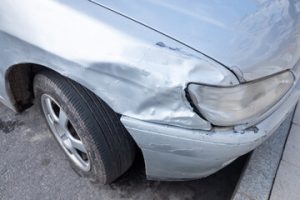
If your vehicle is damaged in a collision, Juanito’s Auto Body repair services restore it to its original condition. This involves working with insurance, disassembling the vehicle, making repairs, and painting. It also includes a quality inspection to ensure that the vehicle meets your standards.

The first step in the process is a detailed assessment of the damage, including hidden structural issues. This will form the basis of your estimate and repair costs.

auto repair

Inspection

One of the most important parts of an auto body repair job is the inspection. Experienced technicians carefully examine the vehicle for structural damage and dents. They will create a detailed damage report, and this will help guide the rest of the repair process.

Once the inspection is complete, your technician will order any replacement parts that are needed for the repairs. They will also dismantle the damaged area and inspect it for hidden or internal damage. This step is especially important if you have an insurance claim, as it will allow the insurer to see that all of the damages have been addressed.

After all of the replacement parts are in place, the repair work will begin. Experienced technicians will use a variety of techniques to restore the appearance and performance of your vehicle. They will remove dents and scratches, repair mechanical components, and paint or refinish your vehicle to look like new.

If you think that the quality of your vehicle’s repairs is not up to par, it is always a good idea to ask for a post-repair inspection. If a post-repair inspection proves that the original repairs were substandard, you may be able to receive compensation from your insurance company. A post-repair inspection can also be beneficial if you notice that your vehicle is not driving as it did before the collision.

Repair

Auto body repair isn’t just about repairing dents and painting; it also repairs internal components that allow your car to drive correctly. Your car’s frame is one of these internal systems, and an auto body shop will typically use a laser system to analyze the structural integrity of your vehicle after an accident. They’ll then replace any metalwork that needs to be replaced to guarantee your car has the appropriate maneuverability and safety on the road.

After a thorough inspection, your car will be dismantled to create a detailed blueprint of the necessary repairs. Then, a trained technician will restore your car’s frame using specialized equipment and computerized electronic measuring devices to ensure it is in alignment with factory standards. The process generally takes several days to complete.

After the frame is restored, your car will be reassembled with new parts. Auto body shops work with a variety of vendors to supply high-quality replacement parts at a reasonable price. They can also find salvaged parts, known as LKQ or like kind and quality, which are used in place of new, factory-issued parts. This saves time and money and is often the best option for vehicles with rare or specialty parts that are difficult to find. Before returning your car to you, the technician will conduct a walk-through with you to show you the completed repairs and ensure that you are satisfied.

Paint

After a comprehensive inspection, technicians will work on your vehicle’s framework to fix dents and other damage. They may use laser frame diagnostic systems to identify what’s needed, and they will repair the mechanical and structural integrity of the car so that it is safe for driving on the road.

Once the structural repairs are finished, technicians will shift their focus to the body. They will repair any scratches, dents, and other cosmetic damage to make your car look like it did before the accident occurred. This includes sanding, priming, and painting the car. Once the car is painted, a clear coat will be applied to protect it from the elements.

A reputable auto body shop will work with your insurance company to ensure that the repair costs are accurate and fair. They will also provide you with a detailed estimate before beginning any work. If additional damage is discovered during the repair process, they will notify you and your insurance company right away.

Auto body repair services can make your vehicle safer to drive and more attractive for resale or trade-in. They can also increase your vehicle’s value by restoring its appearance, performance, and functionality. It’s a great idea to choose a shop that is dedicated to customer satisfaction and offers a lifetime warranty on all its work.

Detailing

Auto body repair services help restore your vehicle after it’s been damaged in an accident. They offer a wide range of services from repairing dents to replacing parts, and can even perform frame straightening to bring your car back to its original condition. The expertise and experience of auto body technicians make the restoration process as seamless as possible.

The first step in the auto body repair process is to assess the damage to your vehicle. Technicians will carefully examine dents and dings to determine the extent of the damage, then create a detailed estimate. This ensures that the insurance company understands the scope of work involved and sets clear expectations for the repair process.

After the estimate is complete, technicians will begin to repair your vehicle. They will use a variety of tools and techniques to fix dents, straighten the frame, and replace broken parts. They will also paint your car to match its original appearance. This can take a few days to a week and may include sanding, priming, painting, and clear coating.

Once the repairs are finished, your technician will reassemble your vehicle and test it to ensure that everything functions as it should. Lastly, the shop will wash and detail your vehicle to give it a showroom finish. If you’ve been in a collision, it’s important to address the damage as soon as possible to ensure the safety of yourself and others on the road.

Top Reasons to Choose Interior Build Outs for Business Growth

A quality interior build-out shows off a company’s brand, attracting customers and building loyalty. It can also increase productivity, saving money on bills and improving efficiency.

Experienced local commercial J&R Construction will understand regulations and best practices for construction in the area. They’ll be able to provide valuable insights, tips, and ideas to help businesses save time, money, and headaches.

construction

Increased Efficiency

An interior build-out, also known as a commercial tenant improvement (TI), transforms a raw or semi-finished commercial space to meet specific business needs. It can include everything from upgrading flooring and painting to full-scale construction involving plumbing, HVAC systems, and lighting systems.

Whether it’s an empty shell of a new building or the existing space in a leased property, a well-designed build-out increases the value of the property. It also helps businesses achieve their goals, improve customer experience, and maximize productivity.

In addition, smart interior design can help a company get the most out of its existing space without needing to lease more property. With a well-planned floor design, spaces for collaboration, and quiet areas, work flows more efficiently, and employees are happier and more productive.

In many cases, the cost of an interior build-out is covered by either the landlord or the new business. Landlords may cover the cost by including it in a lease agreement, or they might give a straight square footage allowance to be used for building improvements.

Increased Productivity

A well-planned interior buildout can increase productivity in the workplace. This is because a smart layout can streamline workflow and minimize distractions. Additionally, the use of quality materials can make for a more comfortable working environment, which in turn can lead to better employee morale.

A productive work environment can also help to improve job satisfaction and reduce absenteeism. Additionally, a good layout can ensure that employees have access to natural light and views. It is also important to consider the health of employees by choosing ergonomic furniture and providing access to healthy foods in the office.

Another important aspect of commercial interior design is ensuring that the space meets all regulations. This includes safety codes, building rules, and accessibility standards. It is also essential to plan for future changes in the business’s operations by using adaptable and flexible spaces that can grow with the company. Lastly, by addressing these requirements early on, the business can avoid costly mistakes down the road.

Increased Brand Recognition

A build-out allows a business to align its physical space with its branding and image. For example, a restaurant may want to add customized shelving or point-of-sale infrastructure. Likewise, a medical office may need exam rooms, ADA compliance features, and sanitary finishes.

A quality build-out also increases a property’s value. By transforming a raw interior into a leasable environment, it attracts long-term tenants and reduces vacancy rates. In addition, using durable materials and smart design reduces maintenance costs and promotes a sustainable lifestyle.

To get the most out of your build-out, choose a commercial contractor with extensive local experience. They will understand the best construction practices and building codes in your area. This will ensure that the project stays within budget, runs smoothly, and is completed promptly. They will also have a strong network of subcontractors and vendors, which saves you time and money. A quality commercial contractor will also use value engineering techniques to find cost-effective alternatives without sacrificing design or functionality. This saves you time and money while ensuring that your build-out is of the highest quality.

Increased Productivity

When done well, a commercial interior build-out can increase productivity by improving the flow of work and encouraging collaboration. Creating smart layouts that prioritize the positioning of workstations, conference rooms, and shared areas maximizes the use of space. This helps companies achieve their business goals without having to move into a larger building.

Experienced contractors can help with design elements that align with business operations, branding, and customer expectations. They can also incorporate technology into the new space to streamline processes and improve efficiency. They can also ensure that the new design adheres to best-practice safety standards for a safe and secure workplace.

In the end, a commercial interior finish-out is the transformation of a white shell into a functional office, store, or restaurant for an existing or future tenant. It is a process that may include both tenant improvements and trade fixtures. Oftentimes, landlords will cover some of the costs of tenant improvements as part of the lease or rent concessions, while the tenant will fund the rest. Titus Contracting Inc. can help tenants plan their budget and work within a timeline that suits their needs.

Increased Productivity

The ability to optimize workspaces for their specific functions increases productivity and helps employees work efficiently. This is especially true in commercial office spaces, where layout choices and the location of amenities can affect employee comfort and efficiency.

In addition to making a space more functional, an interior build-out can increase its value. Whether it’s a business that needs to update the building to meet current design trends or a company that needs more room for business expansion, these updates are great ways to get the most return on investment for any property.

During the construction process, experienced contractors can also use value engineering to ensure the project stays on budget. This involves identifying cost-effective alternatives to maintain the value, functionality, and quality of a project without compromising safety standards. Experienced contractors also know how to plan projects with a tight timeline, ensuring they stay on schedule and avoid costly delays. They can even help make sure that all interior build-outs adhere to the latest safety codes and requirements for accessibility, protecting employees, customers, and visitors.

Commercial Sewer Drain Cleaning Services

Commercial drain pipes can get clogged with fats, greases, soaps, food waste, hair, and other debris. Clogged commercial drains can cause severe plumbing problems and a disruption to your business.

Sewer Drain Cleaning

Commercial Sewer Drain Cleaning Services are required to resolve these clogs and restore proper drainage to your business. There are several methods for cleaning commercial drains, including power snaking, video inspection, hydro jetting, and chemical unclogging agents.

Drain clogs can be annoying at best, and if left unattended can lead to serious plumbing problems at worst. Instead of calling a plumber for expensive drain repairs, homeowners can take care of clogs themselves with the help of a drain snake, a time-tested tool that eliminates clogs and prevents future ones. While it may seem intimidating to use a drain snake, by following a few simple steps, it is easy enough for any homeowner to do at home.

A drain snake, also known as a plumber’s auger or “plumbing snake,” is a long, flexible metal cable with a handle on one end and a corkscrew-like blade on the other. It is designed to navigate the twists and turns of pipes, hooking and breaking up clumps of hair, congealed grease, food waste, gunk, stuck objects, and other debris that accumulate in drains and sewer lines. When a drain snake is used properly, it can remove clogs that would be impossible to clear using chemical drain cleaners, which can damage pipes and emit toxic fumes.

Before you try to use a drain snake, make sure to prepare the area by putting down towels or a bucket to catch any water or debris that might spill. It is also recommended to wear rubber gloves and safety goggles, as the process can be messy. Lastly, it is important to read the instructions specific to your model of drain snake, so you can be aware of any special instructions or precautions that might apply.

Once you’re ready to begin, insert the snake into the clogged drain slowly and feed it until you feel resistance or hear a “give.” When you encounter this, turn the handle to break up or dislodge the clog. If necessary, rotate the snake while feeding it to navigate bends and dislodge more stubborn obstructions. If the clog remains, it might be time to resort to a power-feed snake or a different cleaning method.

While a drain snake can be effective for many types of clogs, there are certain types of blockages that it is not appropriate for. For example, it is not a good idea to use a drain snake on a kitchen sink drain that is clogged with grease because the fat can harden and block the pipe. To avoid clogging your drains with grease, dispose of it in the trash rather than pouring it down the drain. Similarly, regular maintenance with drain covers or strainers can help keep hair and other smaller particles from getting caught in the pipe.

Video Inspection

Performing a video inspection is an excellent way to get an idea of the condition of your plumbing system. A qualified plumber can use a specialized camera to view the interior of pipes and to find damage or problems that may be hard to identify from the outside. This allows him to perform a more accurate and efficient job.

In addition, a video inspection is less disruptive than traditional methods of checking for issues in your sewer pipe line. Plumbers no longer need to dig up large portions of your yard or cut into walls to access the pipes and can instead use existing access points, such as clean-outs and drains. This saves you time and money and helps your plumber work faster.

A video inspection also makes it easier to locate the source of a clog. This is especially important if your pipes are a bit older and have been damaged by previous attempts at removing clogs. Hydro jetting can cause further damage to these old pipes by leaving residue behind, and sometimes clogs simply form at the point of entry into the pipe.

If your plumbing company uses a video inspection for your sewer line, the plumber will be able to see the location of the clog or other problem and can then decide on an effective solution. This can help you to save money on costly repairs that could have been avoided if the issue was caught early.

Using a video inspection can also make it easier to identify the type of material your pipes are made of, which will help determine whether hydro jetting or other pipe-clearing techniques will be effective. Some clogs are caused by materials that can’t be removed with conventional methods, such as dense roots or crushed clay pipes.

A video inspection can also be helpful for identifying other plumbing issues. This can include leaks in your main plumbing line, broken or cracked pipes and joints, and even the presence of insects or animals nesting inside your pipes. These issues can be a huge headache to deal with, but they are easier to fix and less expensive when identified early.

Hydro Jetting

Hydro jetting is a highly effective way to clean drain lines. It uses water hoses with specialized nozzles to blast highly pressurized jets of spinning water sourced from a storage tank into the pipes, breaking apart and washing away solidified or clogged debris. This is a more versatile and efficient approach to cleaning than simply using a metal snake, especially when dealing with grease-based clogs.

When used on a regular basis, this powerful method of drain and sewer line cleaning can help to prevent future clogs and keep your plumbing system in top condition. It also offers an environmentally conscious solution that can be a safe alternative to chemical drain cleaners.

While it is more expensive than some other drain cleaning methods, the initial investment can help to save money in the long run by reducing costly repairs and downtime. It can even provide an attractive return on investment through improved plumbing efficiency and a reduction in waste buildup.

Sewer jetting is ideal for cleaning drains, septic systems, and sewer lines in commercial properties. Its versatility allows it to be used on a range of pipe materials, including PVC, copper, steel, and cast iron. It is particularly well suited for use on older pipes, as it can be used at a lower pressure than other drain cleaning methods without damaging them.

When compared to traditional drain snakes and chemical cleaners, it is much more effective at dislodging blockages. This is because it cuts through the clog rather than simply pulling it out, making it ideal for more stubborn and deep-rooted clogs. The high water pressures can also break up and flush away tree roots, which can otherwise cause recurrent sewer line blockages.

The power of the water jets can also effectively clean inside the walls of the pipes, which is not possible with other methods. This thorough cleaning can dramatically reduce the chances of future clogs and improve the lifespan of your pipes.

However, it is important to note that hydro jetting may not be able to clear certain severe obstructions or damage. As a result, it is essential to have an experienced plumber evaluate your pipes before proceeding with this method.

Chemical Unclogging Agents

When a drain becomes completely or partially clogged, it can be tempting to use store-bought chemical drain cleaners. These products offer a quick and seemingly easy solution to stubborn blockages, but they are often harsh on pipes and can cause long-term damage. In addition, these cleaners are highly dangerous if not used properly. Many of them require the use of full personal protective equipment (PPE), including thick gloves, safety goggles, and a face mask. They also emit harmful fumes that can irritate the throat, nose, eyes, and skin. Furthermore, they can leave behind chemical stains and residues on sinks, toilets, tubs, and other surfaces.

The main ingredient in many chemical drain cleaners is sulfuric acid, which can cause severe chemical and thermal burns if it comes into contact with your skin or eyes. It can also react with water and certain metals to produce hydrogen gas, which can irritate your lungs and throat. Additionally, most of these cleaners are caustic and can erode pipes, leading to expensive repairs down the line.

While liquid drain cleaners may work on some clogs, they are generally not safe for use with garbage disposals or in homes with old or galvanized pipes. They may also corrode or discolor pipes, leaving behind unpleasant odors and stains. Furthermore, they can be toxic to pets and children if ingested.

If you’re looking for a safer and more environmentally friendly option, there are many different natural drain cleaners available on the market. One popular option is a baking soda-and-vinegar mixture, which creates a chemical reaction to break down the organic buildup that causes a clog. This method can take longer than chemical cleaners, but it’s effective on most clogs and won’t harm your pipes or the environment.

When using any type of drain cleaner, it’s important to follow all product instructions carefully. This includes using the correct dosage and allowing specified sitting times. It’s also important not to mix different types of cleaners, as this can cause dangerous chemical reactions that can release hazardous gases or excessive heat. Finally, working in a well-ventilated area helps avoid inhaling fumes and ensures your safety.

Water Damage Restoration Is a Multi-Step Process

Water damage is devastating, and it can weaken walls, warp floors, and sag ceilings. Timely restoration prevents structural problems from compounding, saving you costly repairs down the road.

Water Damage

Water damage mitigation begins with identifying the source of the water and shutting off utilities. Then, water is extracted using specialized equipment, and the space is dried and sanitized. Contact All Pro Services for professional help.

Water damage from burst pipes, flooding, and even a leaky roof can be catastrophic to both the home and its contents. It’s essential to address the issue promptly. It prevents further damage, mitigates health risks, preserves possessions and reduces repair costs. Professionals utilize a wide range of specialized equipment for inspection, water extraction, drying and dehumidification. They use moisture detection tools and infrared cameras to identify affected areas and determine the severity of the water damage. Powerful mitigation pumps and vacuums are used to remove standing water. Attic insulation that has become saturated by water is removed and replaced. Commercial grade air movers and dehumidifiers remove trapped moisture, allowing surfaces to dry quickly and avoid mold and mildew growth. Moisture tests are also conducted to identify the source of the moisture and prevent future issues.

While mitigation and restoration appear to work hand-in-hand, they are separate processes. Mitigation is done immediately after an event to stop further damage, salvage items that can be saved and create barriers to prevent further water intrusion. Restoration is the next step, which takes longer and is more involved. It involves repairing structural elements, cleaning and disinfecting the property, and restoring personal belongings and business equipment.

It’s important to understand the differences between these two services in order to choose the best one for your situation. Skipping mitigation and moving straight to restoration can leave your property vulnerable, leading to recurring problems such as mold growth and weakened structures. To fully recover, it’s crucial to work with professionals who can handle both mitigation and restoration. They’ll ensure your home or business is safe, clean and restored to its pre-water damage condition.

Water Extraction

Water damage caused by sewage backup, flooding, storms, and plumbing leaks requires immediate attention to avoid structural damage, mold growth, and other long-term consequences. Water remediation experts like Restoration 1 begin by conducting a thorough inspection and assessment using moisture detectors, hygrometers, and infrared cameras to identify affected areas and the extent of water intrusion. They then utilize industrial-grade pumps and vacuums to extract standing water as quickly as possible, minimizing the potential for permanent damage.

After removing the majority of the water, professionals dry and dehumidify the affected areas to prevent further damage. Depending on the severity of the situation, this may require the use of air movers, industrial-grade dehumidifiers, and/or cleaning chemicals. This step also helps to minimize the potential for additional mold and mildew growth, which can aggravate existing problems and create additional health risks for occupants.

The last thing any property owner wants is to lose valuable possessions to water damage. Fortunately, acting swiftly to address the problem can increase the odds of salvaging items with both financial and sentimental value, such as family heirlooms, electronics, furniture, and important documents. In addition, prompt water damage restoration can reduce the risk of severe mold and mildew problems, which can cause a variety of health issues for building occupants, including respiratory problems. Mold and mildew are exacerbated by damp, dark, and humid environments, making the timely extraction of water an essential part of any water damage restoration process. For this reason, it is often best to leave this job to professionals with the proper equipment and training.

Dehumidification

During the restoration process, dehumidification is key. This step removes excess moisture from the property and prevents future damage to materials like wood, drywall, insulation, and others. It also halts mold growth and helps restore livable conditions.

Water damage from floods, burst pipes, heavy rainstorms, and appliance failures can be incredibly stressful for homeowners. It’s important to hire professionals as soon as possible to mitigate damage, clean up the mess, and restore the home. This process involves inspecting and assessing the damage, water extraction, drying the area with specialized equipment, cleaning and sanitizing, and any necessary structural repairs.

Stagnant water quickly causes rot, warping, and weakening of building materials, which can lead to costly structural problems. Water restoration services work to preserve as much of the existing structure as possible. This often includes removing and replacing flooring, repairing drywall, and installing new appliances.

One of the biggest issues caused by water damage is the risk of mold and mildew. These harmful substances thrive in damp environments and can cause serious health issues for anyone who lives in or visits the affected area. Timely restoration, including thorough drying and dehumidification, halts mold and mildew growth before it can spread.

While the initial steps of mitigation and restoration may appear similar, they play unique roles in restoring your property. It’s important to understand what each process entails in order to return your home to its pre-loss condition. By understanding the difference between mitigation and restoration, you can make better decisions when a water emergency strikes. To learn more about preventing and responding to water damage, contact your local Rytech Restoration expert today. We have specialists standing by to answer your questions and dispatch a certified technician to your location immediately.

Cleaning

Water damage restoration is a multi-step process that aims to dry and clean a space, repair any damages, and restore it back to its original condition. Professionals perform inspection and assessment using moisture detectors, hygrometers, infrared cameras, and other equipment to identify affected areas and their severity. After removing any standing water, the next step involves drying and dehumidification. Industrial-grade dehumidifiers and air movers are used to pull out the excess moisture, preventing further structural damage. Finally, cleaning and sanitizing are performed to eliminate any bacteria or contaminants left behind by the water.

A property exposed to prolonged water damage is a breeding ground for mold and mildew. These microscopic organisms thrive in damp, dark environments and can cause serious health risks for occupants. To combat the growth of mold and mildew, professionals use specialized cleaning and sanitizing agents during restoration.

During this stage, professionals also assess the integrity of affected structures and materials. They replace any damaged or deteriorated items as needed, such as drywall, insulation, flooring, and furniture. In addition, they conduct structural repairs to bring the property back to its pre-loss state.

Depending on the extent of the damage, restoration may take several weeks to complete. However, prompt and effective action can significantly reduce long-term costs, save belongings, and ensure a safe, healthy environment. In the event of a water disaster, contact a reputable restoration service with extensive experience and certifications. Look for a company that offers 24/7 emergency response, and check Google reviews, testimonials, and before-and-after photos to gauge their quality. Water damage can happen anytime, so be prepared! Contact your local Rytech for fast, reliable help. We’re proud to offer water damage restoration services for homes and businesses throughout the United States.

Structural Repairs

Water damage restoration involves a comprehensive, professional process of mitigating the effects of water damage, drying affected areas, cleaning and sanitizing building materials, structures, and contents, and making necessary structural repairs. It also includes preventive measures, such as identifying and fixing leaks, installing a sump pump or waterproofing a basement, or sealing windows and doors. It may also include routine inspections and maintenance to reduce the risk of future problems, like identifying new cracks or movement in walls or foundation.

Whether from an unexpected event or from gradual wear and tear, commercial buildings need ongoing structural repair and strengthening to maintain stability and meet building codes. These issues may include cracking in concrete, heave or up-lift in floors, or weakened load-bearing components due to earthquakes, design flaws, corrosion, or general ageing. Structural repair methods can include repairing or replacing corroded sections, resurfacing surfaces, and improving drainage to avoid water build-up.

A comprehensive approach to water damage restoration can ensure safe, healthy environments for your employees and customers. Prompt action prevents mold growth and deterioration of building materials, minimizes safety risks, and protects property value. It can also help to reduce downtime and limit repair costs, as well as potential health risks associated with microbial growth, such as bronchitis and other respiratory infections. To ensure a thorough, professional water damage restoration process, it’s essential to work with a company that understands the distinction between mitigation and restoration. This will enable them to provide the best results and long-term peace of mind. Taking a proactive approach to water damage restoration can also improve the long-term efficiency and functionality of your business, reducing energy bills, and helping you comply with environmental regulations.

Ceiling Repair: When to Hire a Professional

A well-maintained ceiling improves the aesthetic of a room and can help prevent structural damage. Nevertheless, even small issues like cracks or water stains should be repaired as soon as possible.

Ceiling Repair

Depending on the severity, these issues should be addressed by an expert to ensure that the repair is done correctly. Contact Ceiling Repair Perth for professional help.

Cracks in your ceiling are often a sign of structural damage, but they can also be caused by a number of other issues. In general, it’s best to take any crack seriously and have it assessed by a professional as soon as possible. That way, the cause can be identified and repaired before it worsens.

While hairline cracks are usually nothing to worry about, longer ones are a different story. Long, wide cracks that run the length of the ceiling can be a sign of serious structural damage and need to be addressed immediately.

One of the most common causes for ceiling cracks is moisture damage, particularly when it’s the result of leaks in your roof or plumbing. This moisture can lead to swelling and eventual cracking of materials like wood and drywall. If your ceiling cracks are accompanied by discolored areas, this is even more of a sign that there is an ongoing issue that needs to be addressed as soon as possible.

Large fluctuations in temperature can also cause ceiling cracks. This is because the rapid changes in temperature can cause building materials to expand and contract at a quicker rate than they would normally. These sudden shifts in temperature can put strain on the ceiling framing and drywall, which can then start to crack.

Bathrooms are another common source of ceiling cracks, because bathtubs and vanities add significant weight to the space above. Unfortunately, many homes’ ceilings weren’t designed to support these heavy loads, and so they begin to crack over time. Eventually, these cracks can even lead to a complete collapse of the ceiling.

Taking the time to assess a ceiling crack can save you from major structural damage and expensive repairs in the future. For a professional assessment, contact a company like Trinity Rose. Our Chartered Surveyors will be happy to look at your ceiling and provide you with a detailed report on its condition. If the crack is serious, we’ll let you know as well so you can get it fixed as soon as possible. Our team is highly experienced in dealing with all types of drywall cracks, so you can count on us for prompt and quality work.

Water Stains

Unsightly water stains in ceilings aren’t just an eyesore—they can also indicate a serious problem. Water leaks in the ceiling cause materials like drywall to weaken, creating a damp environment that promotes mold growth and structural damage. They can even cause electrical damage if the water reaches wiring. It’s essential to find the source of the water infiltration as soon as possible to prevent more extensive and costly damage to the property.

A leaking roof is often the culprit of unsightly water stains on the ceiling, but other factors can cause them as well. Leaky plumbing, poor ventilation in areas like bathrooms and kitchens, or even faulty chimney flashing may all lead to unwanted moisture that manifests as unsightly water stains on the ceiling. Water stains may also result from condensation buildup in the home’s attic space, particularly if there is a gap between the ceiling and the insulation.

To remove water stains, start by cleaning the affected area. Use a bleach solution of one cup of bleach to three cups of water, and spray or wipe the stain with a wet sponge or cloth. Be sure to wear gloves, safety glasses and a face mask to protect yourself from any dust or mold. Rinse and dry the stained surface and allow it to completely dry before applying a stain-blocking primer and ceiling paint.

After the stain is dry, it’s important to repair any damaged areas of the ceiling as quickly as possible. This will help to prevent the water damage from spreading, and will provide a solid foundation for painting. Depending on the severity of the leak or stain, you might need to hire a professional contractor to complete these repairs, or you may be able to complete these repairs yourself.

Water stains on the ceiling aren’t just unsightly—they can also signal a larger problem with your home or business. Ignoring water stains on the ceiling can lead to mold growth and structural damage, and they can even lower your property’s value. Regular inspection and maintenance of your ceilings can keep them looking great and preventing any damage from occurring.

Holes

Holes in the ceiling are not only unsightly, but they can also be a cause of moisture damage in the home, leading to mold and mildew. The good news is that holes in the ceiling are relatively easy to repair, and there are a number of different methods for doing so.

One method involves using a self-adhesive patch that is applied directly to the surface of the ceiling. These are available at most home improvement stores and are relatively easy to apply. However, you should be careful to follow the instructions carefully to ensure that the patch is correctly placed and that the putty is properly applied. It is also a good idea to examine the surrounding area for any signs of moisture damage or other areas that may need addressing.

Another method for repairing holes in the ceiling is to use a drywall patch. These are available at most home improvement stores, and they are essentially patches of drywall that are reinforced with aluminum and can be applied to the ceiling by simply pressing them down on the surface of the ceiling. These are usually available in a number of sizes, and they can be purchased with or without insulation.

Once the patch is in place, you should use a putty knife to fill in any cracks or gaps that remain. You should then allow the mud to dry completely before proceeding with any other repairs.

If the hole was caused by water leaks, it is important to address the source of the leak before attempting any further repairs. This will help to prevent any future damage and will also help to minimize the amount of mud that needs to be applied.

If you are unable to locate the source of the leak, it is possible that there may be a structural problem with the roof. In this case, it is a good idea to consult with a professional to determine the best course of action.

Call a Professional

When your ceiling needs repair, it’s important to consult a professional. They have the tools and materials necessary to make high-quality repairs that will last. Plus, they can save you time and the stress of potentially making mistakes on your own. While hiring a professional may be more expensive upfront, the long-term benefits of a well-repaired ceiling can offset this initial cost.

If you notice cracking or sagging areas in your ceiling, it is important to call a professional right away. These issues could be a sign of structural damage and can lead to a collapsed ceiling if not addressed quickly. Taking the steps to assess and repair these problems is essential for the safety of your family.

Cracks in the ceiling can be caused by a variety of factors. Depending on the size and severity of the crack, a professional can determine whether it is best to simply patch the area or to take further action. To do this, they will carefully examine the ceiling and determine if there are any signs of moisture or other structural damage. They will also recommend any steps that need to be taken to ensure the integrity of the ceiling.

If water damage is present, a professional will first need to identify and locate the source of the leak. This can be difficult, especially if it has been ongoing for an extended period of time. Once the source is located, the professional will remove any water-damaged drywall and replace it. They will then apply joint compound and sand to create a smooth surface, before painting the area with matching ceiling paint.

It’s also important to note that if you notice any signs of mold or mildew on your ceiling, this is a clear sign of severe water damage and should be repaired immediately. If left untreated, this issue can spread to other parts of your home and cause even more extensive damage.

Taking the proper measures to maintain your home’s structural integrity and aesthetics can prevent small problems from becoming large, costly headaches. Inspecting your home regularly, and acting promptly when you see any signs of damage, can help to keep your property in good condition for years to come.

Navigation